Arduino Counter Using Tm1637 Led Display
Di: Jacob
TM1637 using all dot ?
Counting on a TM1637
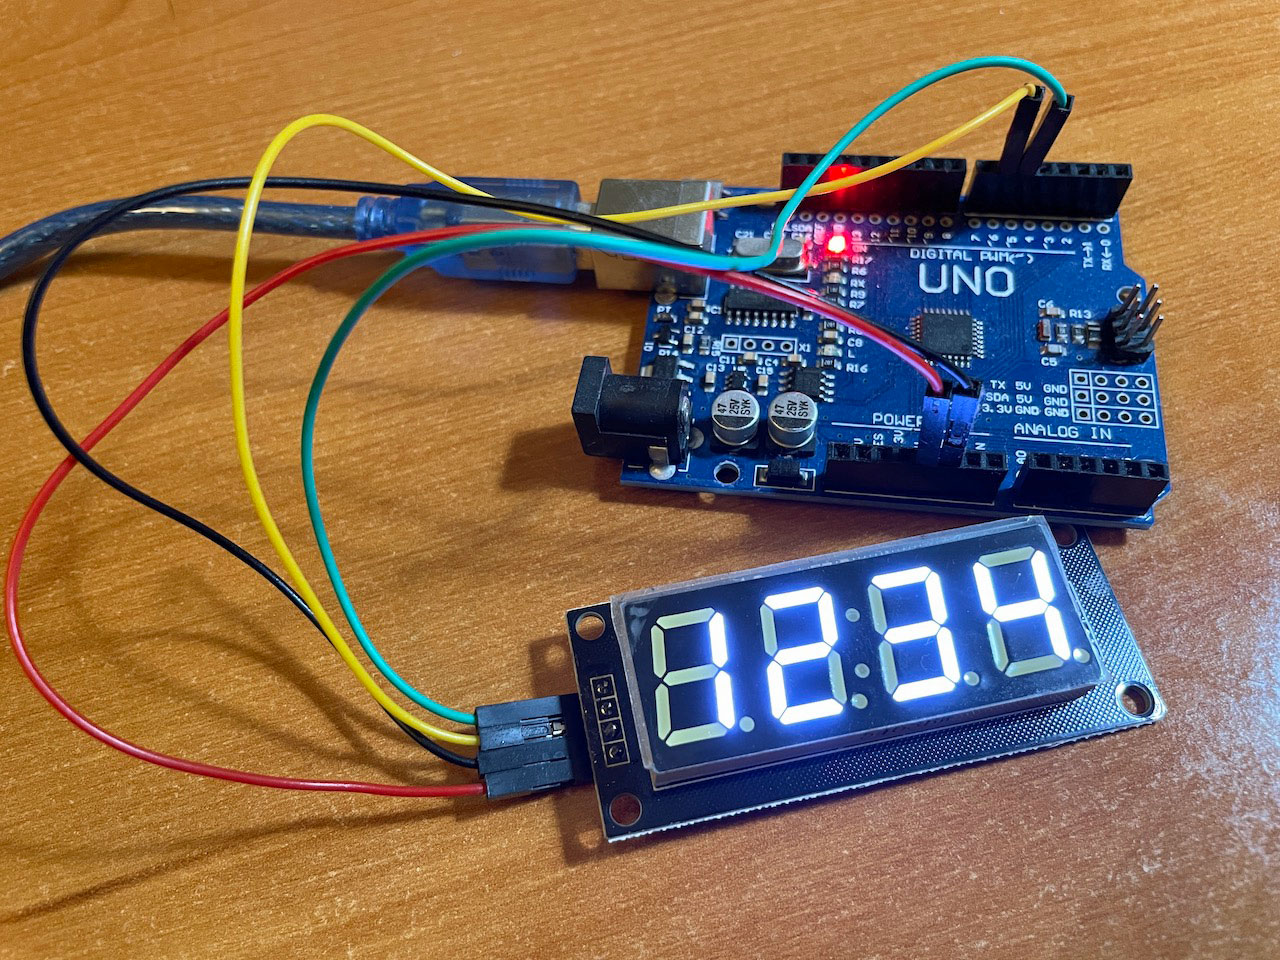
TM1637 4-Digit 7-Segment Display. Each LED, termed a segment, contributes to forming a digit when illuminated.I am trying to create a simple counter that will utilize the e18-d80nk infrared device and display the a count for each pass on the TM1637 LED Display. What changes are required for using another TM1637 along with it.In this tutorial, I am going to show you guys how to control the TM1637 4-Digit 7-Segment displays using an Arduino.: In this project, we will make a Countdown timer(in Minutes and Seconds) with Arduino and 4-Bit 7-Segement display. Start Visuino as shown in the first picture Click on the “Tools” button on the Arduino component (Picture 1) in Visuino When the dialog appears, select “Arduino UNO” as shown on Picture 2
TM1637 4 Digit 7 Segment Display Module with Arduino
Find this and other hardware projects on Hackster. In my hand is a 4-Digit 7-Segment display module.0 so you can use the same functions/methods using this library as any lcd library which conforms to the LCD API.A stopwatch is a timer device that can be used to measure the amount of time that has elapsed between the start and stop of the timer.The Visuino: https://www. Watch the video. If you want to displays sensor data, temperature and .
How to Use the TM1637 Digit Display With Arduino
Hand drawn and photographed is perfectly acceptable.Because there is no reason to do so, but on the other hand, since interrupts are intended for very fast events which must be serviced within microseconds (neither of which is remotely true of a hand-driven rotary encoder), the mechanical contact bounce of the encoder is serviced rapidly leading to a barrage of interrupts each time the encoder moves, . These displays are fantastic for displaying sensor data, temperature, time, etc. For repeated timings, it . The module is a special LED (light-emitting diode display) drive control circuit with a keyboard scan interface that is internally integrated with MCU digital interface, data latch, LED high-pressure drive, and keyboard scan. Step 1: What You Will NeedHi Guys, I am measuring a DC motor’s speed using a arduino nano, a hall effect sensor + magnet on motor, and displaying it onto a 4 digit display.Centre colon on TM1637 4-digit 7-segment LED display?22.Learn how to connect TM1637 4-digit 7-segment display to Arduino, how to program Arduino to display information on TM1637 4-digit 7-segment display.In this tutorial we will learn how to make a simple digit counter using LED Display TM1637 and obstacle avoidance sensor and Visuino.Timer With TM1637 and Arduino: This timer is useful in both domestic and industrial applications.print() and for more details Print. 2021TM1637 6 Digit LED Display – Displays30. I needed some help regarding multiple usage of the 4 digit 7 segment diaplay(TM1637) The example code from the TM1637 library is given .In this tutorial we will learn how to make a simple digit counter using LED Display TM1637 and Visuino.Arduino Display Temperature on TM1637 LED Display: In this tutorial we will learn how to display the temperature using LED Display TM1637 and DHT11 sensor and Visuino.Full tutorial: https://www.This is an Arduino library for 4 and 6 digit 7-segment LED display modules based on the TM1637 chip. These displays are cheaper & best for displaying sensor data, . As there are 12 digital pins available in arduino uno board and only 2 digital pins are needed for the display module, i had a plan to connect all display module to single micro . The TM1637 drives up to six 7-segment LEDs so I expected it to be straight forward.Learn how to display time on 7-segment display using Arduino, TM1637 4-digit 7-segment display, DS3231 or DS1307 RTC module. Step 1: What You Will Need
Arduino Counter Using TM1637 LED Display
2019Weitere Ergebnisse anzeigenIn this tutorial, you will learn how you can control TM1637 4-digit 7-segment displays with Arduino.Hi there, I am almost new to Arduino. However, the way the 6-digit display modules are built, the two blocks of 3-digits were in reverse order . It’s impossible to make it like the OS of a real Blackberry device, but configure the screen using LVGL and add the necessary .Arduino Counter Using TM1637 LED Display & Obstacle Avoidance Sensor: In this tutorial we will learn how to make a simple digit counter using LED Display TM1637 .This guide focuses on TM1637 4 digit 7 segment display module and its interfacing with Arduino.

Countdown Timer(Minutes and Seconds) With Arduino and TM1637 4-Digit 7-Segment Display.r/arduino • Blackberry-style ESP32 device.
TM1637 4-digit 7-segment LED display Arduino tutorial
Other than that, we need 4 capacitors and two resistors and that’s all for the components required to .com/interfacing-tm1637-displa. Connect the DIO pin of the TM1637 display module to another digital pin on the . The detail instruction, code, wiring diagram, video tutorial, line-by-line code explanation are provided to help you quickly get started with Arduino. If it’s at all like the TM1638 library I’m using, it will also have a single function to send a decimal value to the display, using all the digits.Connect the CLK pin of the TM1637 display module to any digital pin on the Arduino (e. I read some advice here (Thanks, @LarryD !), so I tried: display4. Please post your complete code. Connect the TM1637 display CLK and DIO pins to your Arduino GPIO pins, include this library, initialize TM1637TinyDisplay and call easy to use functions like showNumber(), showString(), showLevel() and showAnimation(). Download Free version or register for a Free Trial.
Arduino Display Time on TM1637 LED Display Using RTC DS1307
Hi, Please post a copy of your circuit, a picture of a hand drawn circuit in jpg, png.

The main component of the module is the TM1637 IC and the display module. Circuit schematic diagram and Arduino code at:https://simple-circuit.TM1637 4-Digit 7-Segment Display Module Circuit Diagram.
Interfacing TM1637 4-Digit 7-Segment Display with Arduino
The TM1637 library you’re using should have documentation to tell you how to blank a digit. Start Visuino as shown in the first picture Click on the “Tools” . Find this and other Arduino . All good, except the centre colon. Using a bunch of 4-digit 7-segment column displays (TM1637). Juli 20214 digit display impacts RPM count from Hall Effect Sensor.h library which are; setBrightness(): for setting the brightness of the display. Love the retro tech look.

I m making a digital clock using 6 different tm1637 7 segment display module to display 6 different time. I needed some help regarding multiple usage of the 4 digit 7 segment diaplay(TM1637) The example code from the TM1637 library is given below.Description of code.The heart of this module is an inexpensive Serial LED Driver from Titan Micro Electronics called the TM1637.How to make 4 Digit Counter with 7Segment Display Module TM1637 | TM1637 based Counter with EepromCode, Schematics and Proteus Simulation Download link:- ht. During this time, the load is powered by a relay on the board. Das 4 Digit & 7 Segment Display mit TM1637 Chip ist recht einfach an den Arduino UNO anzuschließen und mit der richtigen Bibliothek zu programmieren.
Arduino
Das 4 Digit 7 Segment Display mit dem Chip TM1637 hat 4 Stellen mit je 7 Segmenten, wobei nach 2 Stellen ein Doppelpunkt dargestellt werden kann. Find this and other Arduino tutorials on ArduinoGetStarted.

#include #include // Module connection pins (Digital Pins) #define CLK 2 . Each segment LED has one connection pin directly accessible from the rectangular plastic package, labeled . TM1637 4-Digit 7-Segment Display Specifications
Arduino Counter Using Tm1637 Led Display
If you want to displays sensor data, temperature and humidity, or want to design a clock, timer or counter, you will need this 4-Digit Seven-Segment Display.A 4-digit 7-segment display is a must-have for any project involving a clock, timer, or counter, but connecting a bare display to an Arduino requires a dozen-or-so pins, . I picked up several 6 digit displays that use the TM1637 chip and wanted to get it to work (made by diymore).This library uses the LCD API v1.In this tutorial we will learn how to display time using RTC DS1307 module and LED Display TM1637 and Visuino. How to make an 7-segment clock. I am jst beginner in aduino programming but pretty fascinated by it. The hall effect sensor is: Hall Sensor Module Magnetic Swich Speed Counting Sensor Module speed Counter Detection Sensor Module 3144 LM393 The display is: **TM1637 4 Bits Digital LED Display . Please post some picture of your project, so we can see your component layout. The circuit diagram of the 4-digit 7-segment display is very simple and needs a couple of components to work properly.There are seven levels of brightness therefore the value can be in 0x0a to 0x0f.Download Visuino here: h.Interfacing TM1637 4-Digit 7-Segment Display with Arduino.Somit ergibt siLearn how to display button press counts on LCD I2C display using Arduino. Please include ALL hardware, power supplies, component names and pin labels. I’ve pulled a bit of this . Estos displays son fantásticos para mostrar datos de sensores, temperatura, tiempo, etc. Furthermore this library (like described in the LCD API) inherent the Print class (See Serial.eu also needs to be installed.
Counter Using TM1637 LED Display & Obstacle Avoidance Sensor
A simple stopwatch with Arduino can be created by using the millis() function, which returns the number of milliseconds since the Arduino board began .This means that you can use all Print class functions/methods like you’re used to .showNumberDecEx(hour, 0b01000000, true, 2, 0); display4.Most TM1637 libraries support displays with 4 digits.Display will scroll text . Connect the TM1637 display CLK and DIO pins to your Arduino GPIO .showNumberDec(minute, true, 2, 2); I also tried a similar solution given in the .En este tutorial, aprenderás cómo puedes controlar los displays de 7 segmentos de 4 dígitos TM1637 con Arduino. In this tutorial, we will learn how to use the TM1637 4-digit 7-segment LED display with Arduino. It is a countdown timer programmable in the range of 1s . ? ? ☕ ??
Create a stopwatch with Arduino and TM1637 display
Unlike the 4-Digits 7 segment display which uses 12 pins to connect with a microcontroller, the TM1637 only uses four pins which makes it .Stopwatches can be mechanical, electronic, or software-based. Step 1: What You Will Need
Using TM1637 4-digit 7-segment LED display with Arduino
This example shows the commonest basic functions of the TM1637Display.7-Segment Display Basics The 7-segment display, also known as the “seven segment display,” comprises seven LEDs arranged in an ‘8’-shaped pattern.
- Iwl Berlin Sr59 Ersatzteile Kaufen Bei Mmm
- Cola-Mentos-Geysir | How To Make A Mentos and Diet Coke Geyser
- Einstellungstest Üben Mv Polizei
- Duales Studium Bei Audi: Karrierechance Für Junge Leute
- Quanti Carboidrati Assumere A Dieta?
- Bernd Römer Vermögensberater – Bernd Höpfl
- Vor Sich Hin Schreibweise , ᐅ wursteln Synonym
- Hahner Onenote Stift _ Integrierten Laserpointer für die Präsentation in OneNote nutzen
- Snat Ports For Outgoing Connection From Azure
- Elixir De Inhame: Para Que Serve, Como Tomar (E Como Preparar Em Casa